So far in this series of articles we have:
- Built a codeplug for the Retevis RT3S, enabling it to operate on the Phoenix (DMR+) network via a local repeater.
- Built a Hotspot and added a new zone to the codeplug, so that the RT3S can access the Phoenix (DMR+) network using the Hotspot.
I chose Phoenix initially, because that is the network that my nearest repeater uses. Whilst this gives worldwide coverage, it is not the only DMR network. Confusingly, there are quite a few networks out there - including Brandmeister, TGIF, FreeDMR and probably others. Each has its own layout of talkgroups and timeslots. Sometimes these are similar, and there are links between networks so that some talkgroups are accessible on more than one network, but each has its own quirks and so they are different and mainly incompatible.
With a Hotspot, it is possible to join more than one DMR network simultaneously - up to four networks - using functionality known as DMR Master. In this blog we will look at building a codeplug that adds Brandmeister to the available Hotspot networks, so that Phoenix and Brandmeister can both be monitored and worked from a single zone on the RT3S. Brandmeister is perhaps the most popular of the DMR networks, with dozens of worldwide talkgroups.
The added complexity comes because Brandmeister and Phoenix talkgroup numbering is incompatible - indeed, it overlaps. So how does the the Hotspot know which network to route the traffic to? The solution is similar to long-distance dialling on a telephone network. We use an access code to break out of our local network and route calls to somewhere else. You can actually design your own access codes and routing, but there are some established ways of doing this that we will follow here. We will assign access code "8" to the Phoenix (DMR+) network, and then build routing rules as follows:
- Any 6-digit group call starting with "8" is sent to Phoenix with the "8" stripped off, e.g. TG800235 is sent to Phoenix as TG235.
- Everything else is set to the Brandmeister network without modification. It is the default routing.
Incoming connections follow the same path in reverse, so that 2-way communication can be established to either network.
For this to work, we need to configure three things:
- Register for Brandmeister, including setting a password and API.
- On the hotspot, we need to configure the DMR Gateway file to handle the routing to two networks.
- On the RT3S codeplug, the best approach is to build a new Zone containing Channels (and hence Contacts) for every Brandmeister and Phoenix talkgroup of interest.
1. Brandmeister registration and API
Take a note of the password, as it will be needed in the next step.
2. Pi-Star DMR Gateway configuration
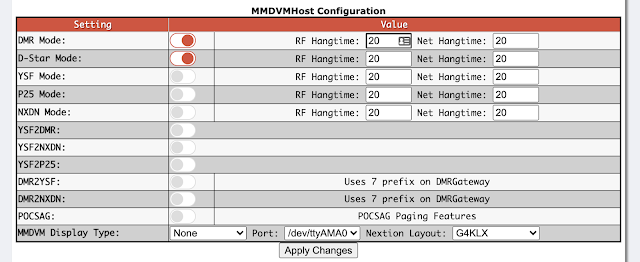
Starting from the Pi-Star Configuration page, go to the DMR Configuration section, and configure as follows:
- Set DMR Master to "DMRGateway"
- Choose an appropriate BrandMeister Master from the drop-down, corresponding to your region
- Enter your Brandmeister password under "BM Hotspot Security"
- Enable the BrandMeister Network
- Select an appropriate DMR+ Master. IPSC2-DVSPh-F is the setting for UK (Phoenix network).
- Enable the DMR+ Network.
Apply Changes and wait for this to be actioned, and now go to the "Expert" menu and from there to the Full Edit: DMR GW screen.
This takes you to a text editor, editing the file DMRGateway.ini. Scroll down a bit, and there are entries for four possible DMR networks. DMR Network 1 is probably pre-configured for Brandmeister, and we will configure DMR Network 2 for Phoenix.
The DMR Network 1 section should look something like this:
Address=2001.master.brandmeister.network
PCRewrite0=2,94000,2,4000,1001
TypeRewrite0=2,9990,2,9990
SrcRewrite0=2,4000,2,9,1001
Password="YOUR-BM-PASSWORD"
Name=BM_2001_Europe [YOUR BM SERVER]
The settings should already be set based on the choices you made in the DMR Configuration menu - so there is nothing to do here. If the Rewrite entries look slightly different don't worry - it should work! These rewrite rules are there mainly to ensure that Reflector routing is handled correctly (and Reflectors are seldom needed).
Now go to DMR Network 2, which will need editing to handle the 8xxxxx routing that we have chosen to use. Edit the Rewrite line (only) as follows:
TGRewrite0=2,800001,2,1,99999
Name=DMR+_IPSC2-DVSPh-F [YOUR DMR+ SERVER]
The format of the TGRewrite line is: TGRewrite=fromSlot,fromTG,toSlot,toTG,range
So the meaning of the line is: If a call is received to TG800001 on timeslot 2, rewrite this to TG1 (still on timeslot 2), and do the same thing for 99999 consecutive talkgroups - i.e. TG800001 to TG899999 becomes TG1 to TG99999.
Press "Apply Changes", cross your fingers and wait. Next, go to the Pi-Star dashboard where (hopefully) DMR will be showing in green and the DMR Master section (lower left) will show connection to Brandmeister and DMR+:
Go to the Pi-Star Admin page, and you should now see the BrandMeister Manager section (sadly there is no corresponding DMR+ Admin facility):
3. Codeplug updates
There are three parts to modifying the codeplug:
- Create Digital Contacts for the required talkgroups on Brandmeister and Phoenix.
- Create Channels for each of the new Digital Contacts (Brandmeister and Phoenix).
- Create a new zone for the DMR Gateway, containing the new Channels.
3.1 Digital Contacts
Each required talkgroup on Brandmeister and Phoenix needs a new Digital Contacts entry. Note that Phoenix contacts will now have a leading "8xxxxx", and so these need to be created anew.
Simply add the new talkgroups to the Digital Contacts table, with Call Type as "Group Call" - except for 4000 and 9990 which are "Private Call".
The Call ID for Brandmeister entries are simply the talkgroup number. For Phoenix entries, pad out the Call ID to 6 digits starting with "8".
My choice of talkgroups and the Contact Names that I gave them is as follows:
Contact Name Call ID Description/Comment BM 91 Worldwid 91 Worldwide
BM 98 Test 98 Radio Test
BM 235 UK 235 UK Call - QSY to 2351 or 2352
BM 2350 UK Ph 2350 United Kingdom - bridged to Phoenix
BM 2351 UK Chat 2351 Chat 1
BM 2352 UK Chat 2352 Chat 2
BM 2353 UK Chat 2353 Chat 3
BM 23526 Hubnet 23526 Hubnet UK
BM 23510 SE 23510 S.East
BM Disconnect 4000 Disconnect (Private Call)
BM Parrot 9990 Parrot (Private Call)
8-1 WW Call 800001 World Wide (Calling)
8-2 EU Call 800002 Europe (Calling)
8-13 Eng Call 800013 World Wide English (Calling)
8-80 UK 800080 UK Wide - User Activated 1
8-81 UK 800081 UK Wide - User Activated 2
8-82 UK 800082 UK Wide - User Activated 3
8-83 UK 800083 UK Wide - User Activated 4
8-84 UK 800084 UK Wide - User Activated 5
8-113 UK Eng 800113 World Wide English - User Activated 1
8-119 WW 800119 World Wide - User Activated 1
8-123 WW 800123 World Wide English - User Activated 2
8-129 WW 800129 World Wide - User Activated 2
8-235 UK Call 800235 UK Wide (Calling)
8-2350 BM Ph 802350 UK Wide (Calling) - bridged to BM
8-2351 CQUK 802351 YSF CQ-UK WIRES-X (User Activated)
8-801 SE Reg 800801 Regional: South East England
8-400 Disc 800400 Disconnect
Note that TG2350 exists on both networks - as do several other talkgroups - and bridges also exist via (for example) Hubnet.
Check the Brandmeister and Phoenix list of talk groups to see if there are any more that you want to add to your configuration.
Your Digital Contacts list should now look something like this - showing some of my Brandmeister entries amongst other channels that I have created (the list does not sort easily, so ignore the "noise" in my codeplug!):
3.2 Channels
For each and every desired Brandmeister and Phoenix talkgroup, create a corresponding Channel. Each entry will look something like this:
Note that for each entry created, the Channel Name should match the Contact Name in the drop-down. The TX and RX frequencies will be those of your hotspot.
3.3 Zone
Finally, create a new Zone named "DMR Gateway", and add the newly-created Channels to it. I have chosen to assign Brandmeister talkgroups to the "A" group (upper line on the RT3S) and Phoenix to "B", as shown here:
All done? Load the new codeplug to your RT3S, select the DMR Gateway zone, and test - starting perhaps with the Brandmeister Parrot.


Comments
Post a Comment