Posts

Keeping the clock accurate on MacOS

FT8 and similar modes require the PC clock (Windows, MacOS, Pi, etc) to be accurate within 2 seconds - and ideally better than that. I have found that Windows 10 and Raspberry Pi seem to be capable of doing this themselves without further intervention, but my MacOS clock can drift out by a few seconds. The solution is to periodically synchronise the clock to an NTP server, via a scheduled cron job. These instructions worked for me: Set the time on an Apple Mac running macOS Mojave for FT8/WSPR | QSO365 ...except that the first part of the instructions required a "sudo" in front of the command: sudo sntp -sS pool.ntp.org
D-STAR, Pi-Star and IC-705

Image
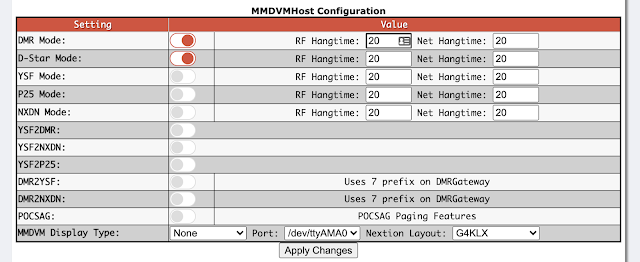
Having got D-Star working via a local repeater, how about using a hotspot? It is pretty straightforward to activate. Firstly, turn on D-STAR in the MMDVM Host Configuration: Next, set your callsign and registered D-STAR password in the D-Star Configuration section. "B" is the suffix for a 70cm hotspot, and "G" because you are an internet gateway. You can set a default reflector, although I find this is of limited value (discussed later). I have left Time Announcements, Callsign Routing and D-Plus turned off mainly because I don't really understand them! Something for future experimentation. On the IC-705, now is the time to program in your hotspot as a digital repeater. Got to Menu / DV Memory / Repeater List - and choose an empty Repeater Group. Name this "Pi-Star" (or "hotspot", or whatever you prefer), and within the Group create a single entry as follows: Type: DV Repeater Name: Pi-Star (or whatever you prefer) Sub Name: Pi-Star (or whate...

Getting started with D-STAR on the IC-705

Image
Although my preferred digital mode is DMR, I thought it would be fun to try D-STAR as well. There are plenty of instructions and videos out there, so I'll keep this one brief. Step one is to register your callsign with the D-STAR Gateway system:  D-STAR Gateway System (dstargateway.org) Actually I'm not entirely certain what you can and can't do if you haven't yet registered, but it seems like a good idea! Next, configure the IC-705 with your D-STAR settings. These can be found in: Menu / Set / My Station / My Call Sign. Put your callsign before the slash and any additional info (such as "P" if portable) after it. Or you could use the field after the slash to identify your rig, especially if you have more than one. Mine is set to "G4CTP   /705". Menu / Set / My Station / TX Message. Use this for additional info sent with your transmission. Mine is set to "Russell IO91RG". It is very useful to load the IC-705 memory with repeater channels. A...

JS8Call on the Raspberry Pi and ICOM IC-705

I've been having a lot of fun with FT8 on the IC-705, on HF, VHF and UHF. However, the "rubber stamp" exchange on FT8 is a bit limiting, so I thought I'd try out JS8 mode. To get started, visit the JS8Call official site , and watch the video there. Unfortunately the IC-705 isn't yet supported on the pre-built releases, although it is possible to pretend it is an IC-7600 and change the CI-V setting on the rig (so that it "pretends" to be an IC-7600). I didn't fancy doing that as it would probably stop other things from working - such as WSJT-X and wfview - so instead I did my own build on Raspberry Pi so that I could have native IC-705 support. The steps I took were: Download and build the latest Hamlib from the GitHub source:  Release Hamlib 4.4 · Hamlib/Hamlib · GitHub . There are instructions for doing the build here:  Setup Raspberry Pi for Ham-Radio (dl1gkk.com)  - about a third of the way down the page. Download and build JS8Call. There are some...

Remote Operation of a Portable Station - Part 3: Putting It All Together

Image
N.B. The current status of the project is that wfview does not provide a reliable link, because it is intolerant of delayed or out-of-sequence UDP packets. Although the remainder of the project is described using wfview, this may not be the ideal solution. Fixed Location Ensure that Wireguard is running, the iptables rules are in place, and the router port forwarding is configured, as described in Part 2 . Portable Station Portable Station Configuration The Raspberry Pi at the Portable Station requires a copy of Wireguard, and wfview. For Wireguard: sudo apt install wireguard Then take the .conf file provided by the Fixed Location (generated in Part 2), and place it in /etc/wireguard. The command will be something like: sudo mv /Downloads/G0XXX.conf /etc/wireguard/G0XXX.conf For wfview: Follow the download instructions at  https://wfview.org/ , using the Raspberry Pi build script included on the downloads page. Connect the Pi to the rig using USB. Some trial-and-error might be need...

Remote Operation of a Portable Station - Part 2: The Fixed Location

Image
Configuring the Fixed Location N.B. The current status of the project is that wfview does not provide a reliable link, because it is intolerant of delayed or out-of-sequence UDP packets. Although the remainder of the project is described using wfview, this may not be the ideal solution. Part 2 follows on from Part 1 , and describes the configuration of the Fixed Station, i.e. the "middle man" in the overall design: Hardware The hardware configuration couldn't be simpler: Any configuration of Pi can be used. I am using the most basic model: a Pi Zero (not even a "W"). It is connected (actually via a USB ethernet dongle) to an ethernet port on my home router, which in turn is connected to the public internet. Router Configuration My home LAN operates in the 192.168.0.0/24 private address space. Yours may vary, of course! The router's address is 192.168.0.1. I have assigned the Pi a fixed address of 192.168.0.2. This assignment is configured in the router. I wo...

Remote Operation of a Portable Station - Part 1: Concept and Design

Image
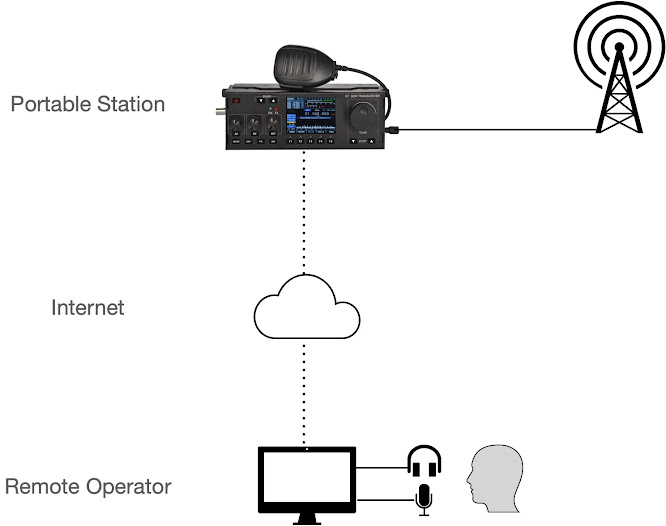
Concept The challenge: Is it possible to put a portable station on a remote hilltop somewhere, and then operate it remotely?  Something like this: This would be pretty straightforward if the portable station had a physical internet connection available, with a fixed IP address. Then the diagram above would be all that is needed. But of course it doesn't, so that presents some challenges! If the portable station has mobile internet available - a fairly safe assumption since it will probably be located on a hilltop - then we can use a mobile router or a hotspot to provide the internet connection. Fortunately I was offered a 3G Router for this project. A 3G Router contains all the functionality of a standard router, including physical ethernet ports, as well as slot for a SIM card and an external 3G antenna. Of course, 4G would be preferable and 5G even more so due to its lower latency, but the 3G Router is what we had to hand. The same thing could be achieved using a 3G, 4G or 5G wif...