Posts

Adding Brandmeister to the Hotspot (DMR Part 4)

Image
So far in this series of articles we have: Built a codeplug for the Retevis RT3S, enabling it to operate on the Phoenix (DMR+) network via a local repeater. Built a Hotspot and added a new zone to the codeplug, so that the RT3S can access the Phoenix (DMR+) network using the Hotspot. I chose Phoenix initially, because that is the network that my nearest repeater uses. Whilst this gives worldwide coverage, it is not the only DMR network. Confusingly, there are quite a few networks out there - including Brandmeister, TGIF, FreeDMR and probably others. Each has its own layout of talkgroups and timeslots. Sometimes these are similar, and there are links between networks so that some talkgroups are accessible on more than one network, but each has its own quirks and so they are different and mainly incompatible. With a Hotspot, it is possible to join more than one DMR network simultaneously - up to four networks - using functionality known as DMR Master. In this blog we will look at buildin...
Constructing a simple dipole for 6m (50 MHz)

Image
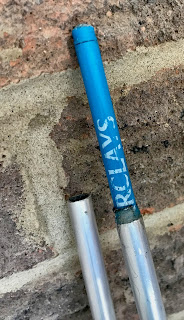
This was a fun little construction project, and very successful. The objective is a dipole for use on 6m, which I can deploy easily with my Vine Antennas Skypole Max , for temporary use on contests and FT8. The dipole uses two sections of telescoping aluminium tube for each element. Although a single piece of tube (or rod) could be used, lengths of over 1m are much more expensive to buy, and also attract additional delivery charges. Constructing the antenna using 1m lengths is much more economical, and gives the possibility of adjusting the element length by sliding one tube inside the other... of which more later. The construction method uses a central plastic box, which provides the following functions: mounting point for the two dipole elements contains a choke balun BNC termination point for the feeder method of attachment to the pole Parts List 125 x 80 x 32 mm project box - Amazon 2 lengths  1m x 10mm aluminium tube - Amazon 2 lengths 1m x 8mm aluminium rod - Amazon - but ...

RT3S VFO Mode

It took me a long time to figure out how to enter and leave VFO mode on the RT3S, because the menu options seem to keep changing! Entering VFO mode is shown in an official video here: https://youtu.be/-q6lOVjAwJs In summary, and starting from "CH Mode", the steps are: Menu > Utilities > Radio Settings > Mode > MR Mode The display should now show frequencies in MHz rather than the channel name. The functionality is unchanged, and you can still access your programmed channels as normal. Notice the small channel number indicator to the right. To get to VFO mode, long press the red key. The indicator to the right changes into a "V". Frequencies can now be entered directly from the keyboard, terminated by the green key. Rotating the channel selector knob now changes the frequencies in channel steps. I haven't worked out how it decides whether to use 12.5 kHz or 25 kHz steps. On mine, the A VFO steps in 25 kHz, and the B VFO steps in 12.5 kHz. Perhaps that...

Adding FM simplex channels to the Retevis RT3S

Image
This is a pretty simple one, but I thought it might be useful to create a Zone containing the 2m and 70cm simplex channels. There aren't enough slots to include the "in between" 12.5 kHz channels, so I have only added the more commonly used 25 kHz channels on both bands. First, create the Channels: I have named them using both the old and the new channel name conventions, i.e.: V40 (S20) - 145.500 MHz V42 (S21) - 145.525 MHz, etc. U280 (SU20) - 433.500 MHz U282 (SU21) - 433.525 MHz, etc. If you need it, a list of channels can be found here:  Simplex_Channel_Frequency.pdf (joomla.com) Note that for the 2m band, the Bandwidth should be set to 12.5 kHz, and for 70cm it should be 25 kHz. Apart from that, the settings are similar: Next, I created a Zone called "FM Simplex", and added each of the channels to it. For convenience, I put 2m channels in bank A, and 70cm channels in bank B. In each case, I put the calling channel in slot 1: Finally, I created a scan group ...

Cloudlog

I have decided to change from using QRZ.com to Cloudlog as my primary logging software. The main reason for doing this is so that I own the database on my machine, rather than trusting it to someone else's server. It is installed on a Raspberry Pi - and that is where the database lives. Although this machine isn't on 24 hours/day, it is normally turned on when I'm doing anything related to amateur radio. If I need logging from a remote location (e.g. if I'm operating whilst on holiday), then I can leave the Pi running at home. I followed the installation instructions here:  https://github.com/magicbug/Cloudlog/wiki/Installation  - except that the resulting installation had a problem with php-xml until I changed from PHP 7.3 to PHP 7.4, i.e.: sudo apt-get install php7.4 php7.4-curl php7.4-mysql php7.4-mbstring php7.4-xml php7.4-openssl Why this should be is a mystery... but it worked for me! Next, I set my router's port forwarding so that incoming Port 80 points to ...

Keeping the clock accurate on MacOS

FT8 and similar modes require the PC clock (Windows, MacOS, Pi, etc) to be accurate within 2 seconds - and ideally better than that. I have found that Windows 10 and Raspberry Pi seem to be capable of doing this themselves without further intervention, but my MacOS clock can drift out by a few seconds. The solution is to periodically synchronise the clock to an NTP server, via a scheduled cron job. These instructions worked for me: Set the time on an Apple Mac running macOS Mojave for FT8/WSPR | QSO365 ...except that the first part of the instructions required a "sudo" in front of the command: sudo sntp -sS pool.ntp.org

D-STAR, Pi-Star and IC-705

Image
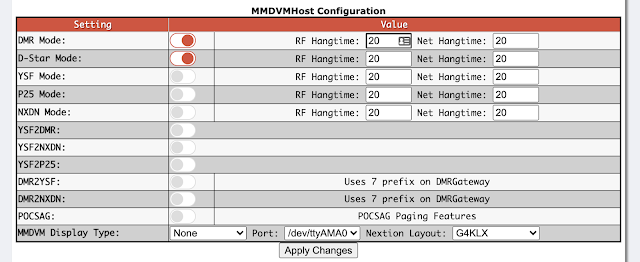
Having got D-Star working via a local repeater, how about using a hotspot? It is pretty straightforward to activate. Firstly, turn on D-STAR in the MMDVM Host Configuration: Next, set your callsign and registered D-STAR password in the D-Star Configuration section. "B" is the suffix for a 70cm hotspot, and "G" because you are an internet gateway. You can set a default reflector, although I find this is of limited value (discussed later). I have left Time Announcements, Callsign Routing and D-Plus turned off mainly because I don't really understand them! Something for future experimentation. On the IC-705, now is the time to program in your hotspot as a digital repeater. Got to Menu / DV Memory / Repeater List - and choose an empty Repeater Group. Name this "Pi-Star" (or "hotspot", or whatever you prefer), and within the Group create a single entry as follows: Type: DV Repeater Name: Pi-Star (or whatever you prefer) Sub Name: Pi-Star (or whate...